> ## Documentation Index
> Fetch the complete documentation index at: https://rllm-org-rllm-19-feat-renderer-parser-backend.mintlify.site/llms.txt
> Use this file to discover all available pages before exploring further.
# rLLM UI
> Web interface for monitoring and analyzing rLLM training runs in real time.
**Repository**: [rllm-org/rllm-ui](https://github.com/rllm-org/rllm-ui)
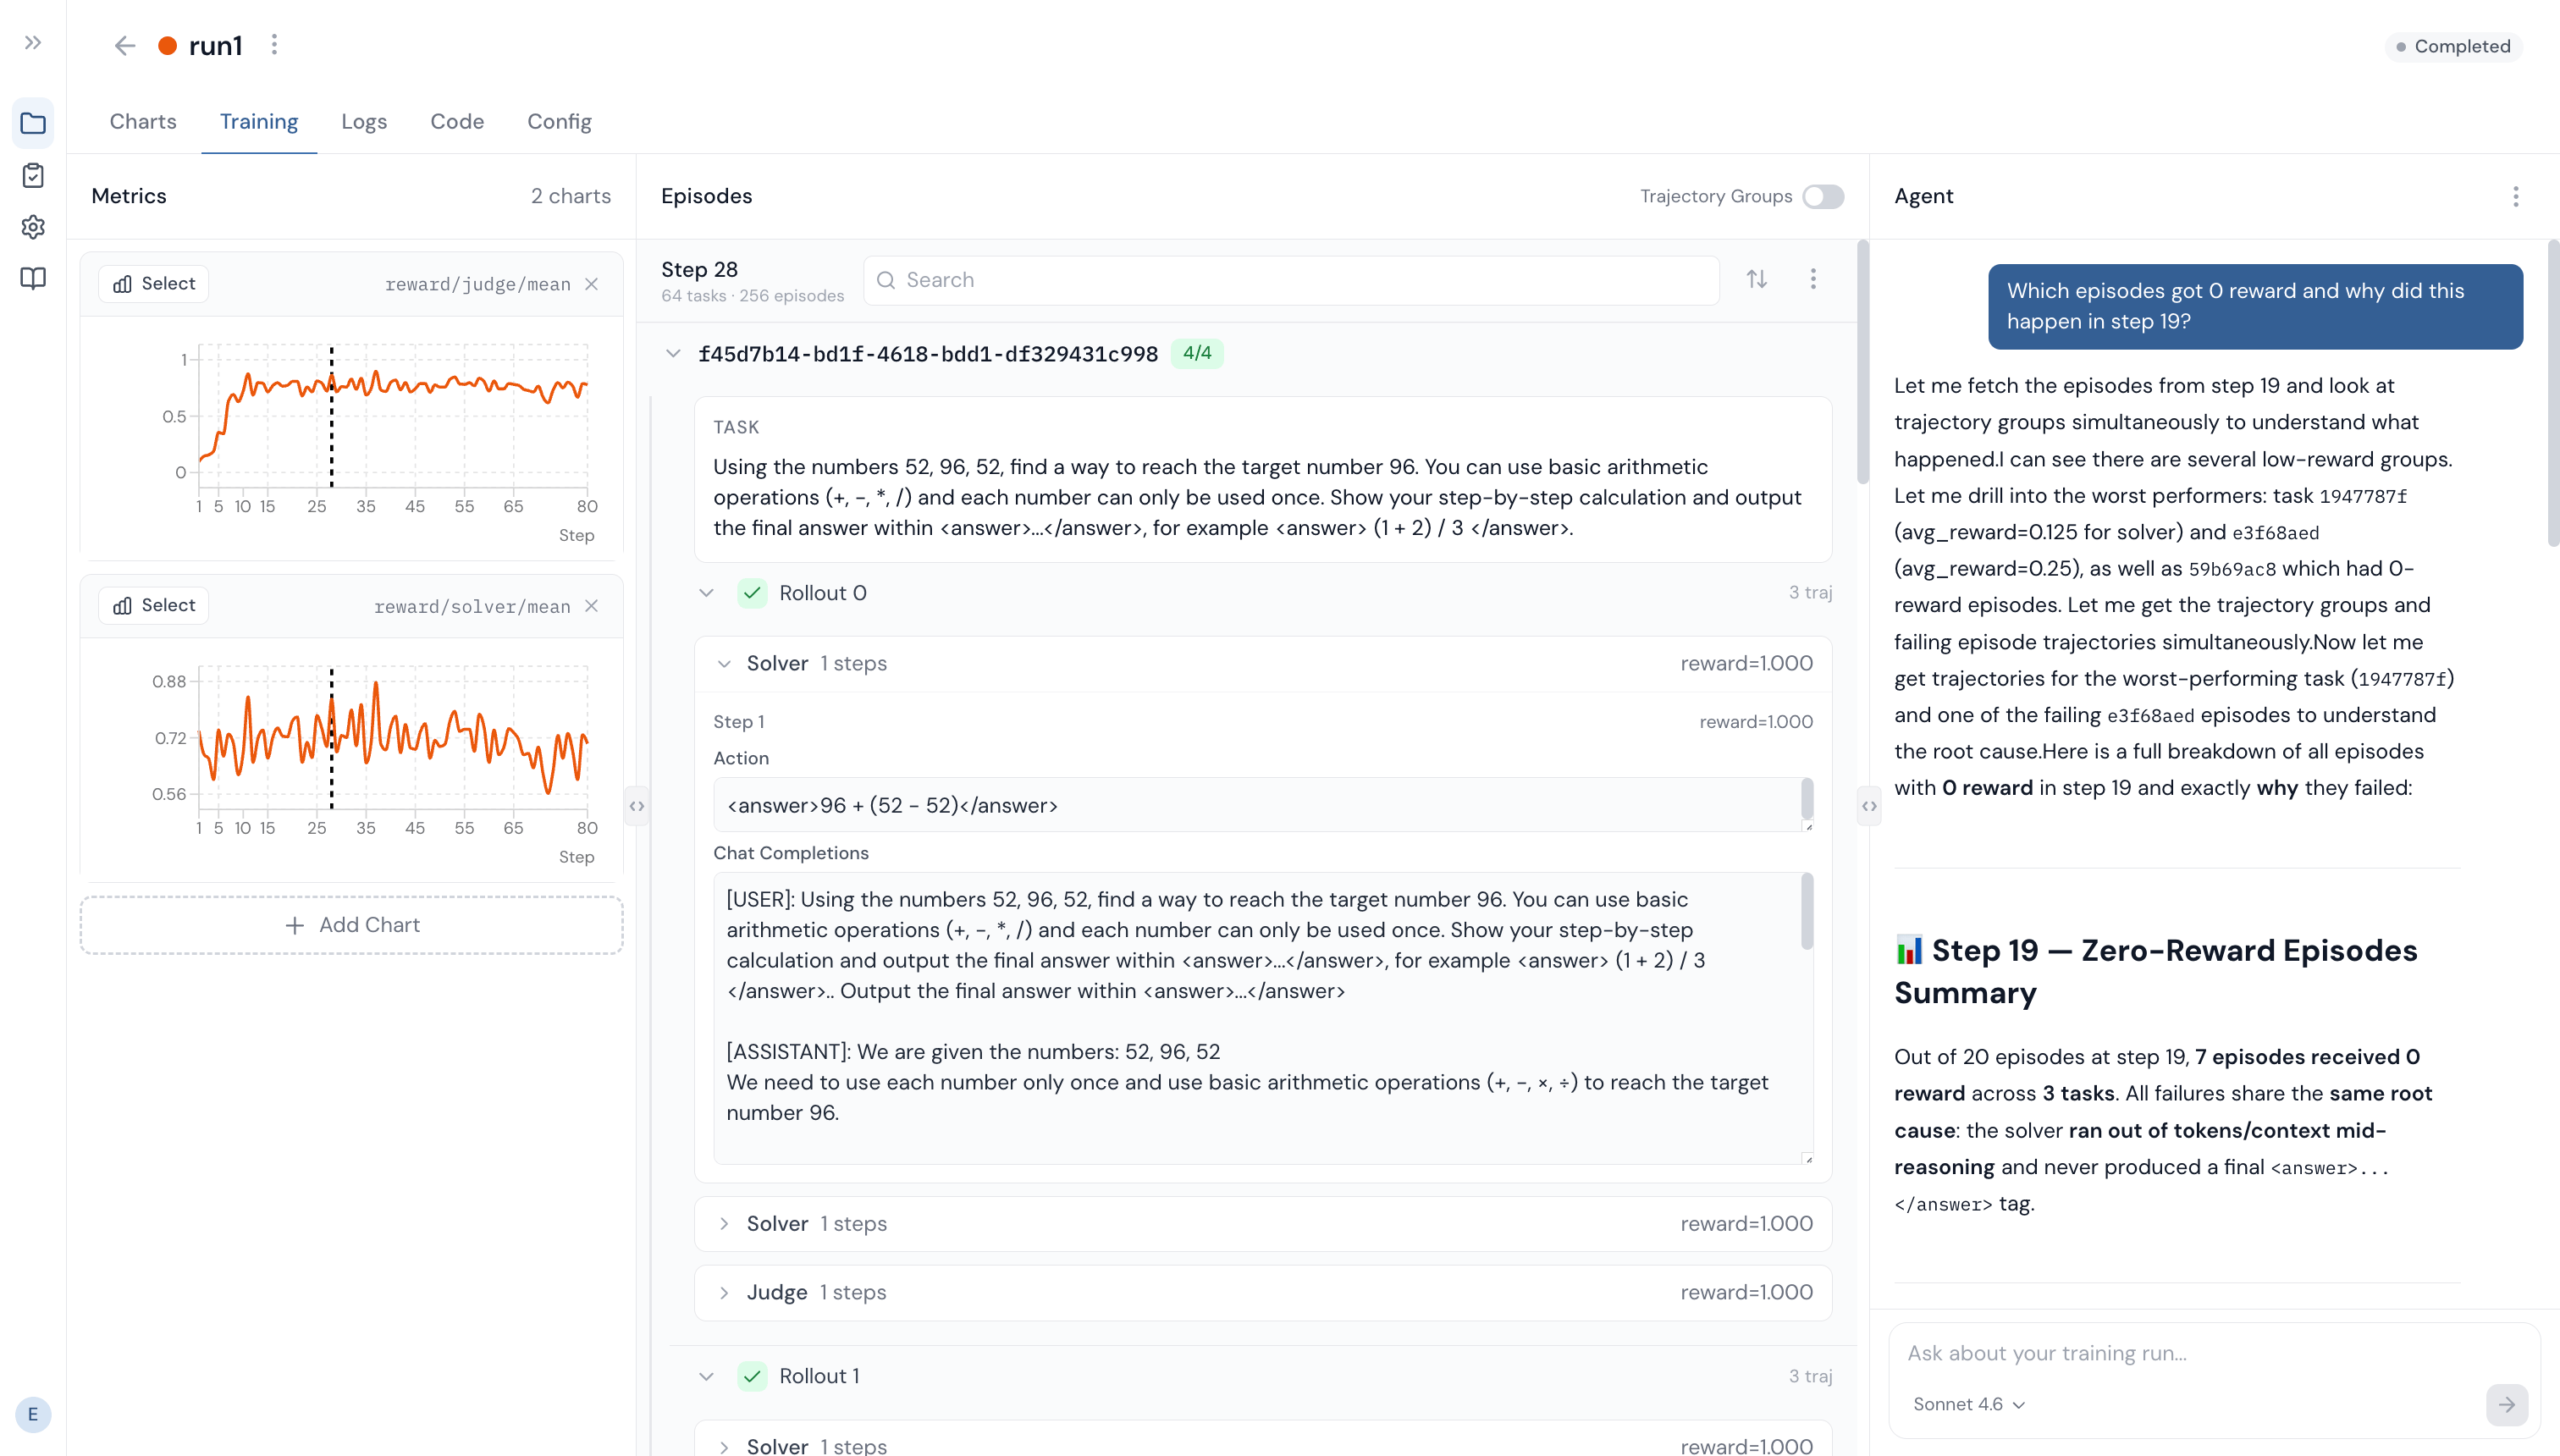
Web interface for monitoring and analyzing rLLM training runs in real time. Think of wandb dedicated to rLLM, with powerful features such as episode/trajectory search, observability AI agent and more.
 ## Getting started
There are two ways to access rLLM UI:
1. **Cloud** — Use our hosted service at [ui.rllm-project.com](https://ui.rllm-project.com) (see [below](#cloud-setup)).
2. **Self-hosted** — Run locally from the repository (see [below](#self-hosted-setup)).
## Cloud setup
Run `rllm login` in your terminal.
Sign up at [ui.rllm-project.com](https://ui.rllm-project.com).
Copy your API key (shown once at registration) and paste it in the terminal (or save it as `RLLM_API_KEY` in `.env`).
That's it. No need to set up the database and other configurations.
| Variable | Required | Scope | Default | Description |
| -------------- | -------- | ------------------- | ----------------------------- | ------------------------------------------------------------------------------- |
| `RLLM_API_KEY` | Yes | Training script env | — | API key for authenticating training data ingestion (shown once at registration) |
| `RLLM_UI_URL` | No | Training script env | `https://ui.rllm-project.com` | Defaults to cloud URL when `RLLM_API_KEY` is set |
The observability AI agent can be enabled by adding your `ANTHROPIC_API_KEY` in the **Settings** page in the UI — no extra configuration needed.
## Self-hosted setup
```bash theme={null}
git clone https://github.com/rllm-org/rllm-ui.git
cd rllm-ui
# Install dependencies
cd api && pip install -r requirements.txt
cd ../frontend && npm install
# Run (two terminals)
cd api && uvicorn main:app --reload --port 3000
cd frontend && npm run dev
```
Open `http://localhost:5173` (or the port shown in the Vite output).
If you run the API on a port other than 3000, update both sides so they know where to find it:
* **rLLM training side** — `export RLLM_UI_URL="http://localhost:"`
* **rllm-ui frontend** — set `VITE_API_URL=http://localhost:` in `frontend/.env.development`
### Database
rLLM UI stores sessions, metrics, episodes, trajectories, and logs in a database so they persist across restarts and are searchable.
* **SQLite** (default) — No setup required. A local file (`api/rllm_ui.db`) is created on first run.
* **PostgreSQL** — Adds full-text search with stemming and relevance ranking. Set `DATABASE_URL` in `api/.env`:
```bash theme={null}
DATABASE_URL="postgresql://user:pass@localhost:5432/rllm"
```
### Observability AI agent
To enable the agent, set your Anthropic API key in `api/.env`:
```bash theme={null}
ANTHROPIC_API_KEY="sk-ant-..."
```
### Configuration
| Variable | Required | Scope | Default | Description |
| ------------------- | -------- | --------------------------- | ----------------------- | ---------------------------------------------------------- |
| `RLLM_UI_URL` | No | Training script env | `http://localhost:3000` | URL of your local rllm-ui server |
| `DATABASE_URL` | No | `api/.env` | SQLite | PostgreSQL connection string. Defaults to SQLite if unset. |
| `ANTHROPIC_API_KEY` | No | `api/.env` | — | Enables the built-in AI agent |
| `VITE_API_URL` | No | `frontend/.env.development` | `http://localhost:3000` | Only needed if the API runs on a non-default port |
## Connecting rLLM to UI
### Training runs with script
Regardless of the service (cloud or self-hosted) you use, add `ui` to your trainer's logger list in your rLLM training script:
```bash theme={null}
trainer.logger="['console','wandb','ui']"
```
### Training / Evaluation runs with rLLM CLI
If using our cloud service and rLLM CLI, you can run training and eval runs as such:
```bash theme={null}
rllm train [dataset name]
rllm eval [dataset name]
```
If logged in, traces will automatically stream to the UI.
## How it works
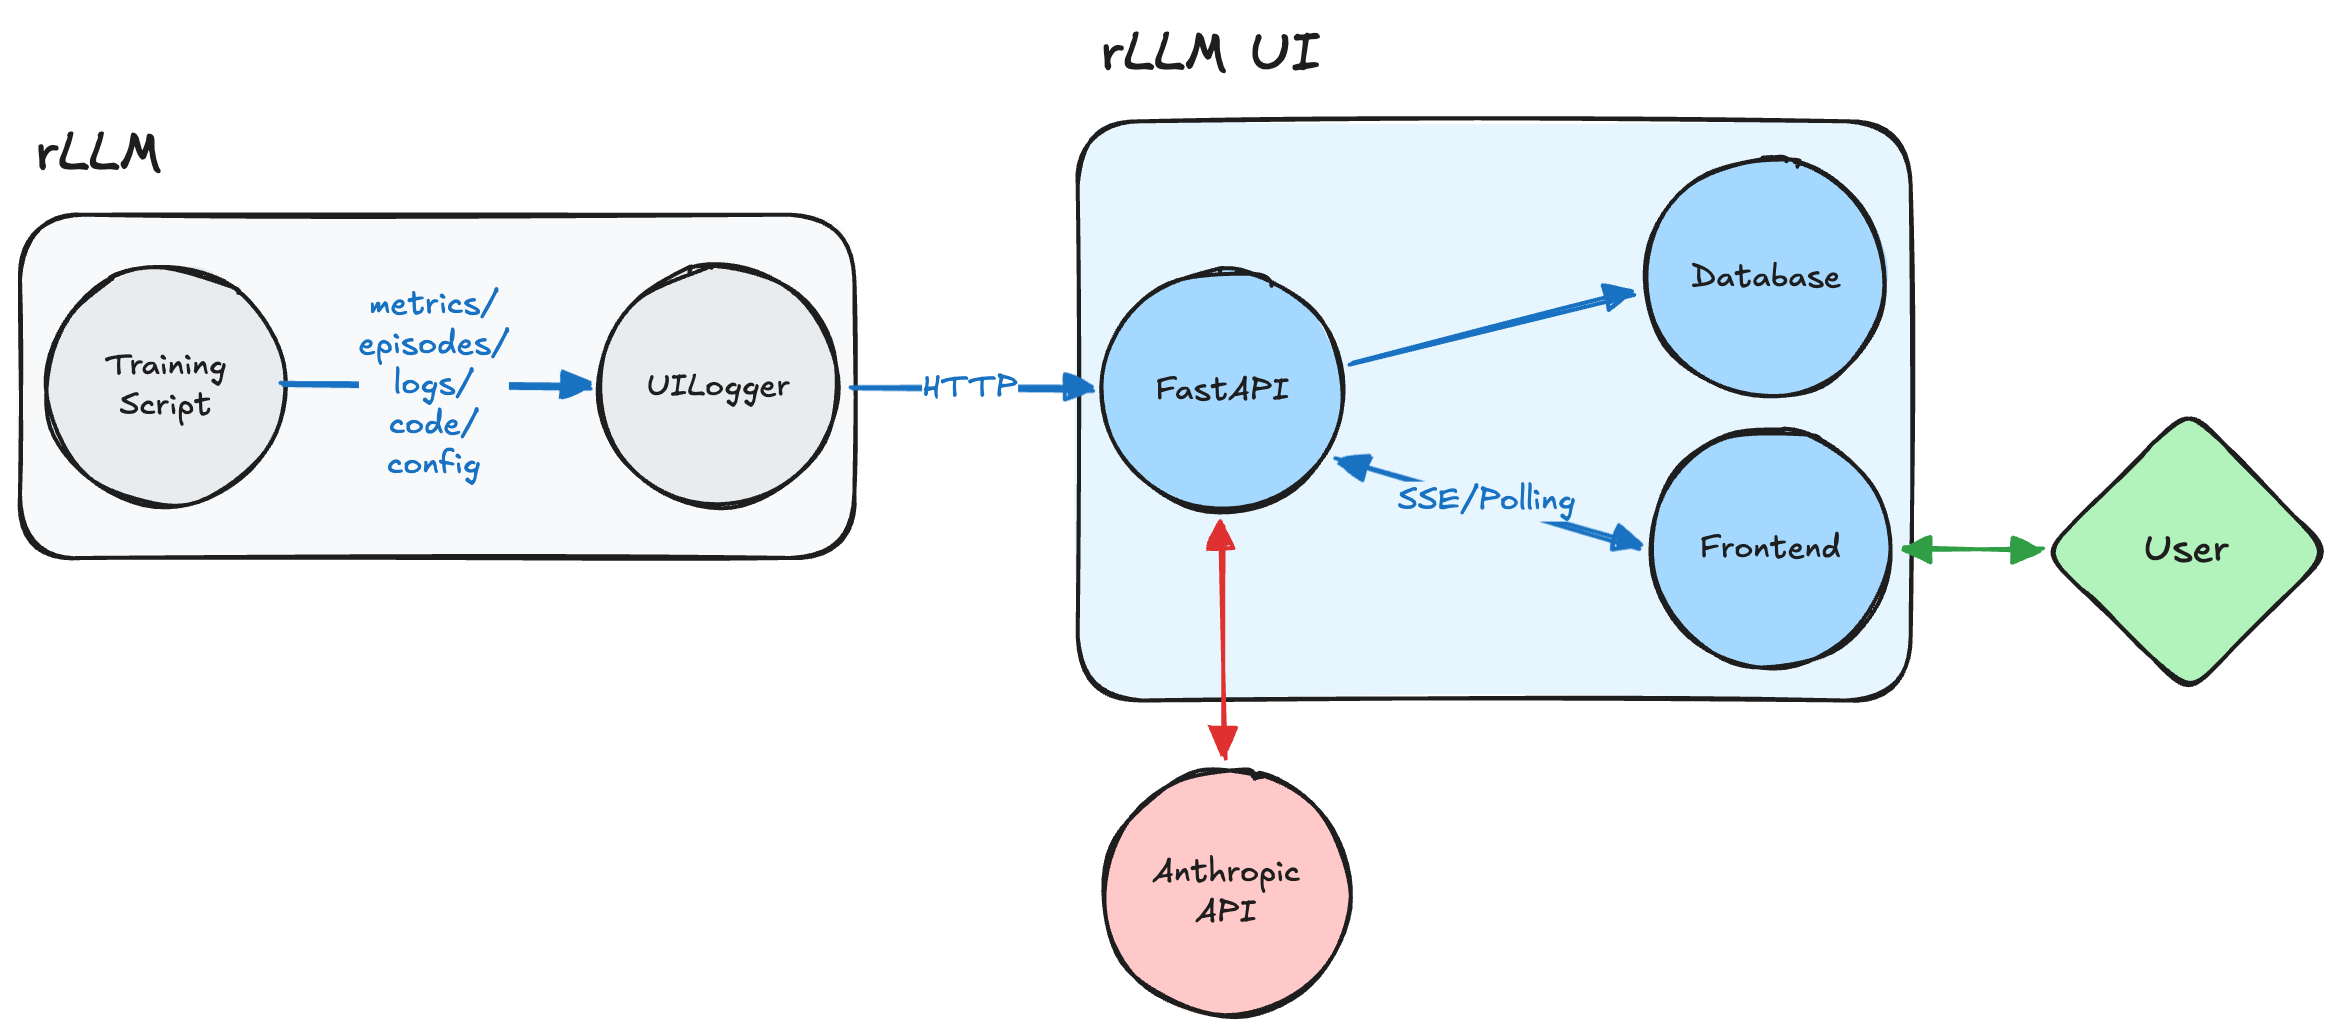
rLLM connects to the UI via the `UILogger` backend, registered as `"ui"` in the `Tracking` class ([`rllm/utils/tracking.py`](https://github.com/rllm-org/rllm/blob/main/rllm/utils/tracking.py)).
**On init**, the logger:
1. Creates a training session via `POST /api/sessions`
2. Starts a background heartbeat thread (for crash detection)
3. Wraps `stdout`/`stderr` with `TeeStream` to capture training logs
**During training**, the logger sends data over HTTP.
So the overall flow looks like:
## Getting started
There are two ways to access rLLM UI:
1. **Cloud** — Use our hosted service at [ui.rllm-project.com](https://ui.rllm-project.com) (see [below](#cloud-setup)).
2. **Self-hosted** — Run locally from the repository (see [below](#self-hosted-setup)).
## Cloud setup
Run `rllm login` in your terminal.
Sign up at [ui.rllm-project.com](https://ui.rllm-project.com).
Copy your API key (shown once at registration) and paste it in the terminal (or save it as `RLLM_API_KEY` in `.env`).
That's it. No need to set up the database and other configurations.
| Variable | Required | Scope | Default | Description |
| -------------- | -------- | ------------------- | ----------------------------- | ------------------------------------------------------------------------------- |
| `RLLM_API_KEY` | Yes | Training script env | — | API key for authenticating training data ingestion (shown once at registration) |
| `RLLM_UI_URL` | No | Training script env | `https://ui.rllm-project.com` | Defaults to cloud URL when `RLLM_API_KEY` is set |
The observability AI agent can be enabled by adding your `ANTHROPIC_API_KEY` in the **Settings** page in the UI — no extra configuration needed.
## Self-hosted setup
```bash theme={null}
git clone https://github.com/rllm-org/rllm-ui.git
cd rllm-ui
# Install dependencies
cd api && pip install -r requirements.txt
cd ../frontend && npm install
# Run (two terminals)
cd api && uvicorn main:app --reload --port 3000
cd frontend && npm run dev
```
Open `http://localhost:5173` (or the port shown in the Vite output).
If you run the API on a port other than 3000, update both sides so they know where to find it:
* **rLLM training side** — `export RLLM_UI_URL="http://localhost:"`
* **rllm-ui frontend** — set `VITE_API_URL=http://localhost:` in `frontend/.env.development`
### Database
rLLM UI stores sessions, metrics, episodes, trajectories, and logs in a database so they persist across restarts and are searchable.
* **SQLite** (default) — No setup required. A local file (`api/rllm_ui.db`) is created on first run.
* **PostgreSQL** — Adds full-text search with stemming and relevance ranking. Set `DATABASE_URL` in `api/.env`:
```bash theme={null}
DATABASE_URL="postgresql://user:pass@localhost:5432/rllm"
```
### Observability AI agent
To enable the agent, set your Anthropic API key in `api/.env`:
```bash theme={null}
ANTHROPIC_API_KEY="sk-ant-..."
```
### Configuration
| Variable | Required | Scope | Default | Description |
| ------------------- | -------- | --------------------------- | ----------------------- | ---------------------------------------------------------- |
| `RLLM_UI_URL` | No | Training script env | `http://localhost:3000` | URL of your local rllm-ui server |
| `DATABASE_URL` | No | `api/.env` | SQLite | PostgreSQL connection string. Defaults to SQLite if unset. |
| `ANTHROPIC_API_KEY` | No | `api/.env` | — | Enables the built-in AI agent |
| `VITE_API_URL` | No | `frontend/.env.development` | `http://localhost:3000` | Only needed if the API runs on a non-default port |
## Connecting rLLM to UI
### Training runs with script
Regardless of the service (cloud or self-hosted) you use, add `ui` to your trainer's logger list in your rLLM training script:
```bash theme={null}
trainer.logger="['console','wandb','ui']"
```
### Training / Evaluation runs with rLLM CLI
If using our cloud service and rLLM CLI, you can run training and eval runs as such:
```bash theme={null}
rllm train [dataset name]
rllm eval [dataset name]
```
If logged in, traces will automatically stream to the UI.
## How it works
rLLM connects to the UI via the `UILogger` backend, registered as `"ui"` in the `Tracking` class ([`rllm/utils/tracking.py`](https://github.com/rllm-org/rllm/blob/main/rllm/utils/tracking.py)).
**On init**, the logger:
1. Creates a training session via `POST /api/sessions`
2. Starts a background heartbeat thread (for crash detection)
3. Wraps `stdout`/`stderr` with `TeeStream` to capture training logs
**During training**, the logger sends data over HTTP.
So the overall flow looks like: